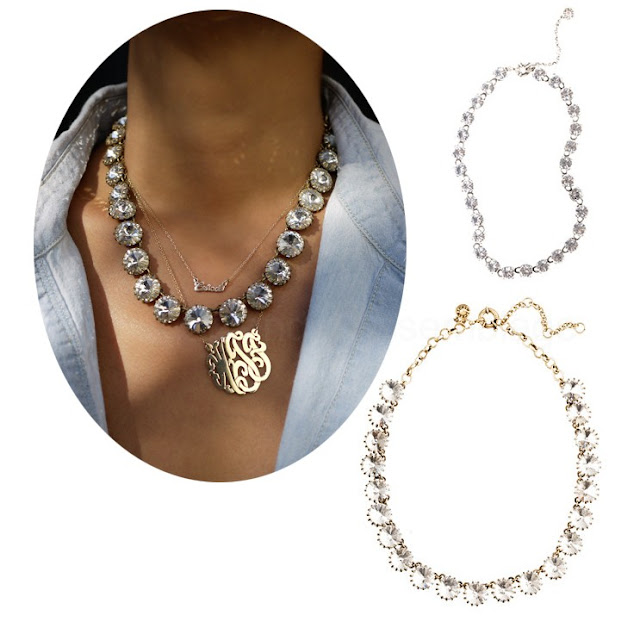
I am deep into sparkly, glittery, dazzling things this season. I especially have a glitter problem but I try to ignore the signs and I continue totally abusing it. Proof of that coming soon but for now lets focus on sparkly, crystally, dazzly (not sure these officially are words but hey..) glam things!
By things I mean necklaces and a specifically the gorgeous Crystal Venus and Collection Martha Necklaces by J. Crew.
Inspiration
(Images via Honestly WTF - J.Crew)
My DIY Version
You will need:
- clear crystal cabochons (easily found on Etsy and very cheap)
- cabochon settings with lace edge in the same size as your cabochons
- chain
- clasp and jump rings
- E-6000 glue
- pliers
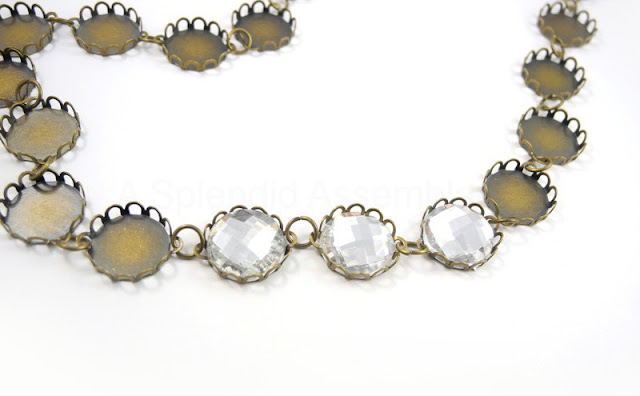
I used 15mm cabochons and bronze settings/chain/findings for this necklace. You can use any metal you want just remember to use cabochons and settings of the same size.
Using your pliers bend two of the lace "bumps" of your settings, one on each side.
Start connecting your settings using the jump rings until you have the desired length for the crystal part of your necklace.

You will attach chain later on so you don't need to have a full length of crystals. Measure it on your self, add/remove settings accordingly and calculate the length of chain that you will need to attach in the end.
Once you have connected the desired amount on settings get your crystals and glue.
Apply a small dot of the glue on each crystal and position them on each setting pressing firmly.
Apply a small dot of the glue on each crystal and position them on each setting pressing firmly.
Leave the necklace aside for a few minutes (or longer if you want, it is up to you) so that the glue dries a little bit. Cut the chain in the length you noted earlier and then cut that in half. Using the pliers and the jump rings attach each piece of chain on each end of the necklace. Then attach a jump ring on one end of the chain and the clasp on the other.
Let the glue dry some more and you are done :)
xoxo


ποπο τελειο!!
ReplyDeletelooks awesome, can't wait to try it!
ReplyDeleteBeautiful! Do you recall the Etsy vendor you got the cabochons from? I can't locate ones that look like these, only smooth ones.
ReplyDeleteThanks
Beautiful!
ReplyDeleteDo you recall the Etsy vendor you ordered from? I can't locate cabochons like these, only the smooth ones (in 15mm).
Thanks
Hello Whitni.
DeleteI got mine locally at a craft store so I can't really point you to an Etsy shop for these. I think 12mm ones are more common on Etsy though and would still look great on the necklace. It is not a big difference :)
This is an awesome diy!!! I have the J.Crew Venus flytrap necklace and it's one of my favorites. I might have to try this in a bracelet version.
ReplyDeletesuch a cute diy :)
ReplyDeleteplease come visit me at my blog? I'm new and would appreciate some support :)
rosiebxxx.blogspot.co.uk
xxxx
you are a genius! i am so glad that i found your blog on craftgawker. i am sticking around to snoop. new follower for sure! heartandthrift.blogspot.com
ReplyDeleteA helpful tip: I would recommend attaching another jump ring on the cabochon holder. I found that before I added the additional jump ring, the cabochons would easily flip over revealing the back of the holder, and the second jump ring really helped stabilize it.
ReplyDeleteHello Swong!
DeleteI did not have this problem, I simply made sure to align all settings and insert the jump rings in the same direction when linking them. Thank you for the tip I am sure it will help :)
Thanks for this tip! I just made several necklaces recently and am having the same problem.
DeleteThanks for such a great tutorial! I've made 5 of these recently to give as Christmas gifts. (And one for myself.) I think they'll be a hit!
DeleteWow this is really pretty. Thanks for sharing.
ReplyDeleteI love it! Pinning....
ReplyDeleteVery cute! Great knock-off
ReplyDeleteThis is so pretty! One of these is surely in the offing for me!
ReplyDeleteI have just made one and I don't know what I did wrong but my cabochons loses their "sparkle" from the glue. They no longer shine!! What am I doing wrong ?? Im using e6000. Someone please help and tell me what to do. I love making my on jewelry but thi one has me stumped . HELP please:((
ReplyDeleteHello Lynn,
DeleteDo your cabs have a foil bottom to protect the glass from the glue? If they do not or if it "melts away" from the chemicals in the glue that may well be the reason they lose their reflection.
HELP !! I have just finished making this necklace and for some reason as soon as I put the glue on it and place it in the cabochon holder my cabochon looses its "sparkle". It looks like the glue is doing something to the back of the cabochon ? Is anyone else having this problem?? I'm using Acrylic Gems from Hobby Lobby, and e6000 glue. I love this necklace but something isn't right. HELP:(((
ReplyDeleteThank you Dina for responding , after I made this post I looked at my gems and my 15 mm are Thr "real acrylic gems". And the necklace I practiced on was some gems I bought in bulk at Hobby Lobby, those are low quality and that's why thy did that. I'm making another one with the real acrylic gems and this one is turning out beautiful:)) thanks agian!, Lynn
ReplyDeleteI wonder if I could use $ store floral gems as stones & empty bottle caps as settings? I know I'd have to do some drilling in the bottlecaps 4 the jump rings but I'd like 2 try it.
ReplyDeleteSure, you can absolutely use any combination. The bottle caps as base would just result in a bigger necklace :)
DeleteI wonder if I could use $ store floral gems as stones & empty bottle caps as settings? I know I'd have to do some drilling in the bottlecaps 4 the jump rings but I'd like 2 try it.
ReplyDeleteIf you are up for it, sure! It will be quite large though but an interesting project no less :)
DeleteI need clarification. Do I need to buy the foil backed stones, or non -foil backed stones? Can the stones be acrylic? Thank you for your help!
ReplyDeleteFoil backed ones work best since they reflect the light nicely and give a mirror effect. You just need to make sure the quality is good so that the foil does not disintegrate under the glue.
Delete