Showing posts with label DIY Tutorials. Show all posts

DIY: J.Crew Inspired Crystal Bracelet

Kicking off some of the spider webs around there with a spin-off to the J.Crew Crystal Venus Flytrap Inspired Necklace DIY I did a while ago. 
This time, a bracelet.

Spring still seems a tad reluctant to stay but summer should be arriving soon and there is no reason for your wrists to be bare. This crystal bracelet DIY is easy, fun and full of bling.

 
You will need:

DIY: Pyramid Wrist Bag

Holiday parties all around and you really don't want to be carrying a large handbag that makes it difficult to dance or has you worrying about keeping an eye on it when you leave it aside.
That is why I love wristlets!
Spacious enough to carry your necessities and small enough to keep it around your wrist at all times.

My friend Kostas over at Milloo handbags was kind enough to put together this Pyramid Wrist Bag tutorial so we can all make out own little party wristlets :)


 This wristlet measures approx 18cm/7'' so adjust your leather size accordingly if you want a smaller or larger version.

You will need:


DIY: You Go Glen Coco T-shirt - Free Printable

  While lost in the never-ending lands of Pinterest, I stumbled upon a "You Go Glen Coco" top. If you have watched the movie "Mean Girls" you can understand that I of course had to have it, and so I clicked and clicked going through the endless links trying to find the source. I gave up when I ended up in some weight loss web page that seems to be the destination of every pin lately. 
Like a Pinterest plague!
Anyhow, I of course did not let that get in my way and I quickly decided to make my own design and share it with all the cocos out there!
 
 It is mainly Christmas themed due to the candy cane motif, but can also be a great touch if you decide to go for a Mean Girls themed Halloween costume.
If you haven't watched "Mean Girls" you may not appreciate this as much so I recommend that you watch it :p

You will need:

DIY: Button Cardigan Chain

I really love it when a DIY involves recycling things you don't use anymore. A pair of old clip on earrings, old buttons or a chain necklace that we never wear anymore. Lets put them into good use by making this lovely cardigan chain :)
You will need:


DIY: Detachable Brogue Hearts

As much as I love a leather fringe tongue on brogues, one can only see so many fringes before one gets really tired of them. I am one, so I decided to make something different for my brogues. 
Detachable tongues yes, but not fringed; hearts! 
 How cute is that! Very, according to myself :)

You will need:


DIY: Glitter Studded Ballerina Flats

I believe that every lady has a pair of shoes, never worn, forgotten somewhere in her shoe drawer or closet. I don't wear flats so these little fellas have been abandoned for quite some time. If mind serves, I purchased these ballerina flats in 2006, in a Primark somewhere in London and never wore them. I figured it was about time I do something with them and this DIY for Glitter Faux Studded Ballerina Flats was born.

You will need:

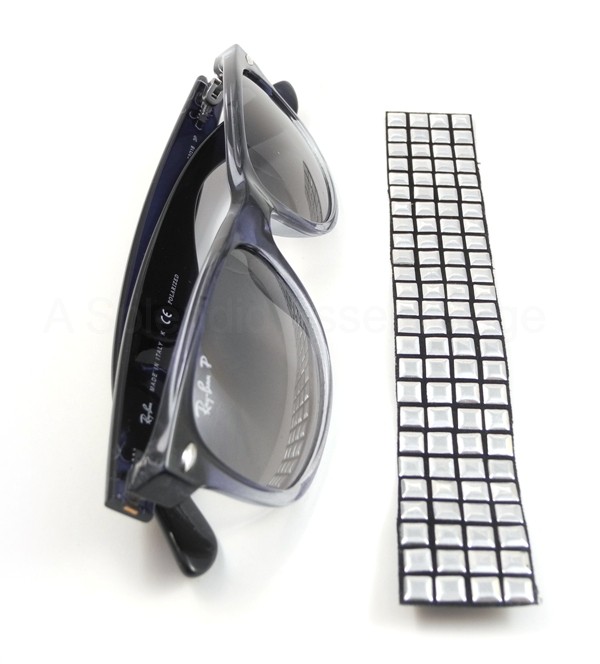
DIY: Studded Sunglasses

Studs don't seem to be going away anytime soon so I decided to give in to the trend and add a stud fix to my new sunglasses. I didn't want to glue a bunch of studs on them though so while looking for an alternative I thought of hot-fix studs.
They come in reels which means I could measure and cut up pieces that would fit the arms of my sunglasses, they are already arranged and aligned on the "band" they are on and and would not be hard to remove when I get over the studs trend.

 An easy, flexible and cute way to style your sunglasses :)

You will need:

DIY: Halloween Candy Corn Charm

Even thought I don't quite like candy corn, I can't deny it is one of my favorite Autumn and Halloween decor accents. I love the yellow and orange colors that contrast the black spooky Halloween themes so this year I decided to make a few candy corn charms.
Candy corn is very easy to make using polymer clay but be careful to keep it away from children so that they do not confuse it with the edible, real candy corn.
 
You can also use this DIY to make candy corn for other uses such as pendants, brooches, earrings etc.

You will need:


DIY: Glitter Ring

A while ago, Pippa from BuzzFeed Shift asked me to contribute a ring DIY for their Craft Wars segment. Given my glitter obsession I of course wanted to make a dazzling glitter ring to contrast the gray winter days ahead.

You will need: 

DIY: Glitter Striped Top

It would be a great understatement to say I am excited to share this DIY simply because I am beyond ecstatic to do so! I love love love this! Whether you like glitter or not you can't deny there is something alluring to transforming a simple plain top to a dazzling brand new piece!
This is a fantastic way to add a much needed sparkle to your autumn/winter outfits and absolutely great to get some tops ready for the holidays.

DIY Glitter Striped Top
I honestly love it and it looks so so so much better in person, the pictures really don't do it justice. 
 

You will need:


DIY: J.Crew Inspired Crystal Necklace


I am deep into sparkly, glittery, dazzling things this season. I especially have a glitter problem but I try to ignore the signs and I continue totally abusing it. Proof of that coming soon but for now lets focus on sparkly, crystally, dazzly (not sure these officially are words but hey..) glam things!
By things I mean necklaces and a specifically the gorgeous Crystal Venus and Collection Martha Necklaces by J. Crew.

Inspiration
J.Crew Inspired Crystal Necklace DIY
(Images via Honestly WTF - J.Crew)

My DIY Version
J.Crew Inspired Crystal Necklace DIY

You will need:

Halloween Make-Up DIYs & Inspiration

Halloween is more than a month away but deciding on a costume and overall look can take quite some time. Besides you know what they say, the early bird gets the cool costumes before they sell out, right? I still don't know what I am going to go for this year. All I can think of is zombies after watching The Walking Dead. It is so hard to decide! Zombie or squirrel? Deputy or annoying kid that never listens to anyone and gets people killed? (I'm looking at you Carl...)
Regardless, I put together these really cool spooky Halloween make-up ideas and tutorials for some much needed inspiration. Fake wounds DIY included!

*Update*
 Here is what my first try using MakeUpBlossom's fake wounds DIY looked like.
 Need to work on contouring but getting there. I am sure the Walking Dead will call any minute now. 
Or not..

(Image via Carros Beauty)


DIY: Celine Inspired Knot Bracelet

 I have been lusting over the Celine Knot bracelet for months and have been extremely unlucky in finding it. I figured it was time to get over it by making something similar while hunting down other autumn necessities. Given my current color obsession I decided to get adventurous and not just go for a metallic version.

Inspiration
DIY Celine Inspired Knot Bracelet
(images from here and here )

My DIY version
DIY Celine Inspired Knot Bracelet

You will need:


DIY: Curb Chain Ring


While browsing important web sites the other day, I stumbled upon some pictures of Gwen Stefani and fell in love with a curb chain ring she had on. Long story short I decided to make my own version and recycle some broken rings while at it.

Inspiration
While browsing important web sites the other day, I stumbled upon some pictures of Gwen Stefani and fell in love with a curb chain ring she had on. Long story short I decided to make my own version and recycle some broken rings while at it.Now, if you can handle a torch and silver you can make a similar version with silver curb chain and some solder. If not then this is a much better way for you to create this style.  A very cute project and quite easy too!  You will need:  -  plain rings (I used some broken adjustable rings I had laying around)  - curb chain (best if the width is the same or larger than the rings)  - E6000 glue  - pliers  - toothpick and an old ring box cushion or a piece of styrofoam  You can use brand new or recycle old rings. I used some broken (their decorations had come off) adjustable ring bases. Since the chain will decorate them don't worry if there is any discoloration or chipping etc.   Start by wearing the ring you will use. Place a piece of the curb chain on it and count the links you need to use to cover the ring's surface. Use your pliers to open and detach the links needed from the rest of the chain.  Continue by placing your ring on a piece of styrofoam or an old ring box cushion to keep it stable while working on it.  Apply a little amount of glue on the toothpick and spread it along the top of the ring. Carefully put the chain links over the glue on the surface of the ring. Align the chain along the ring and apply a bit of pressure on it for a few seconds.  Let it dry for a while and you are done! You can use different metals such as bronze, copper etc. I made this in silver, bronze and neon pink by applying some nail polish on the chain.  Mix it up and enjoy! Hope you like it :)  xoxo
Pictures via JustJared & Jennifer Zeuner

My DIY version 
While browsing important web sites the other day, I stumbled upon some pictures of Gwen Stefani and fell in love with a curb chain ring she had on. Long story short I decided to make my own version and recycle some broken rings while at it.Now, if you can handle a torch and silver you can make a similar version with silver curb chain and some solder. If not then this is a much better way for you to create this style.  A very cute project and quite easy too!  You will need:  -  plain rings (I used some broken adjustable rings I had laying around)  - curb chain (best if the width is the same or larger than the rings)  - E6000 glue  - pliers  - toothpick and an old ring box cushion or a piece of styrofoam  You can use brand new or recycle old rings. I used some broken (their decorations had come off) adjustable ring bases. Since the chain will decorate them don't worry if there is any discoloration or chipping etc.   Start by wearing the ring you will use. Place a piece of the curb chain on it and count the links you need to use to cover the ring's surface. Use your pliers to open and detach the links needed from the rest of the chain.  Continue by placing your ring on a piece of styrofoam or an old ring box cushion to keep it stable while working on it.  Apply a little amount of glue on the toothpick and spread it along the top of the ring. Carefully put the chain links over the glue on the surface of the ring. Align the chain along the ring and apply a bit of pressure on it for a few seconds.  Let it dry for a while and you are done! You can use different metals such as bronze, copper etc. I made this in silver, bronze and neon pink by applying some nail polish on the chain.  Mix it up and enjoy! Hope you like it :)  xoxo

Now, if you can handle a torch and silver you can make a similar version with silver curb chain and some solder. If not then this is a much better way for you to create this style.
A very cute project and quite easy too!

You will need:

DIY : Shatter Polish Sunglasses


Do you ever happen to buy a certain nail polish shade more than once? Even if the first one you bought is still brand new and unused in your drawer? I sure hope so else I should really seek some help with that. I buy the same colors way too often and it is becoming a bit of a problem especially when I go through lazy periods when I don't use nail polish at all. The poor things just waste away.

This fantastic blue from O.P.I is one of those purchases. A triple one actually. For some reason I found it clever to buy it three times even though I remembered I bought a blue not long ago. I guess I didn't want to risk it as if it would go out of production or something. In my defense it is an amazing blue shade and since I came up with a project for it now I am in the clear. Yes? Yes!
I thought of this DIY when I got a pair of free sunglasses with the September issue of Elle and I just love the result.
Blue and fuchsia shatter polish sunglasses
 

You will need:


DIY: Embellished Tank Top

There is still a little time left before we put away our summer tees and tops. That means there is still time left to give some of them a makeover and why not continue wearing them throughout fall. 
This DIY by Alisa Burke is a great way to transform your favorite summer top and will look great under a cardigan or a V neck as the weather gets chilly :)

DIY: Embellished Tank Top
 (Images via Alisa Burke)

You will need:

DIY: Glitter Earring Posts

Doesn't everything look so much better covered in glitter? Lately I have been contemplating applying a layer of glitter on everything. Before making my day-dreaming obsession of a glitter wall a reality though, I thought it is best to start small.

Glitter earring posts!
So easy, so cute and so sparkly!

You will need:


DIY: Hairstyles for Curly Hair


There are so many DIY ideas for beautiful hairstyles on the web but it really seems that the majority of them is mainly suitable for naturally straight or wavy hair. What about curly hair? There are many many tutorials on how to curl your hair yes, but what about women with naturally curly hair that want to spice up the way they wear it?
It was a little difficult to find cute, non ordinary curly hairstyle ideas but the few that are out there are so pretty that they make up for it :)

(via Mr. Kate)


DIY : Red Heart Hoodie

 Forget wearing your heart on your sleeve. Currently it is all about wearing your heart closer to where it belongs. Well..on your chest.
Hearts are everywhere and -the soon to be here- Autumn will find them in many combinations on chunky knitwear, sweaters, tops, cardigans and the list goes on.
There is plenty of inspiration out there :


I decided to beautify one of my hoodies following the heart trend and I am totally obsessed with the result. I went with a classic red heart but I see myself going crazy with color combinations soon and I really have to keep myself from doing this to all my tops.


A plain, bulky gray hoodie that I usually rock after the gym is now beyond cute and I just love it!

You will need:

DIY: Embellished Denim Shirt

There are a lot of ways to spice up a shirt that include lace details, studs and of course glam...lots of glam! It is time for some shirt collars to get a serious bling!
Summer is soon waving goodbye I have been repeating this sentence in my head since May..not a fan or the heat and this little DIY is a fantastic way to add some sparkle to those chilly evenings when a shirt is much needed. 


 How fab will this collar look during fall and winter peaking under those knitted pieces!
The crafty masterminds at Honestly WTF have put together this fantastic DIY that you can follow to embellish your denim shirts.

You will need: